With NOS 5.0, Brocade VCS fabrics now provide support for network programmability using a RESTful API. In this post, I demonstrate how the API can be used to manage VXLAN overlay-gateway functionality in the VDX.
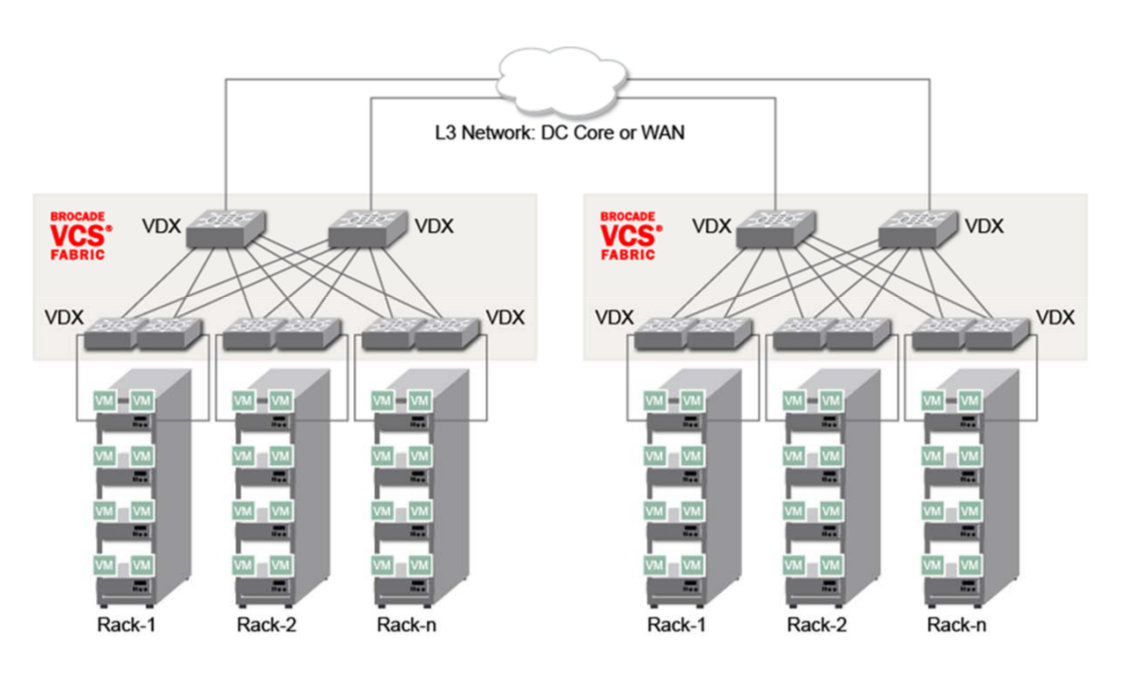
The Overlay Gateway feature in the VDX can enable layer 2 extension across multiple routed VCS fabrics using VXLAN encapsulation. In the diagram, there are two VCS fabrics connected by a layer 3 core. Should the need to provide layer 2 connectivity between servers in one fabric to another, we can create a VXLAN tunnel across the network- from any VLAN in one fabric to any VLAN in the other.
We can do this from the CLI using the below commands, but since I’m trying to improve my programming skills, we will replicate this configuration process in Python using the Requests module.
1 2 3 4 5 6 7 8 9 10 11 | |
As you can see, there are quite a few steps involved in creating a VXLAN overlay gateway. You need to
- Define an overlay-gateway name
- Set the gateway type to l2 extension
- Specify a loopback id to use for the VTEP
- Attach an RBridge ID
- Map a VLAN to a VNI
- Activate the overlay gateway
- Define a name for the remote site
- Specify remote site’s IP address of VTEP
- Specify which vlans to extend
The full source code can be found here, but the following snippets might provide the gist of what needs to be accomplished.
For all of the REST calls made here, I use a base configuration URI of
http://<switch_ip_address>/rest/config/running to access the running configuration resources. The VDX
supports create, read, update, delete (CRUD) operations using the standard HTTP methods GET, POST, PUT, PATCH,
and DELETE. All requests payloads are represented as XML elements.
There are helper functions in vfx_payload.py that are used to build the xml payload data for all of the REST calls needed to configure and activate the overlay-gateway. ElementTree is used to build and parse the XML as needed. The example here returns the XML payload for creating the overlay-gateway (the first step required to create a tunnel).
1 2 3 4 5 6 7 8 9 | |
In vfx.py, I use the Python Requests module to create the overlay-gateway via a POST request to the management virtual IP of the VCS fabric (getting the payload from the above code) Basic Authentication and header details are all setup in the class initialization.
1 2 3 4 5 6 7 8 9 | |
You can basically repeat this process for each of the overlay gateway configuration tasks – building the xml payloads and and making the corresponding POST/PUT/DELETE request that is needed.
The REST calls themselves are all in a class called overlay_gw. When creating an instance of overlay_gw,
several parameters are initialized, the configuration URL is defined, and the request sessions is setup.
A media type of application/vnd.configuration.resource+xml must be specified in the Accept header field
of the request.
1 2 3 4 5 6 7 8 9 10 11 | |
Creating an instance of overlay_gw and making the propper calls will build the configuration on one fabric. Repeat the process on the other and the tunnel should be online. The final command to create a tunnel with my script is
1 2 3 4 5 6 7 8 9 | |
Run the command against the remote switch and you should have a VXLAN tunnel between two fabrics.